

Before going further into web service API implementation, Let’s walk through the what is web service, why do we need a web service, what is REST API and then implementation.
Prerequisites
- What is a Web Service?
- Why do we need a Web Service?
- What is RESTful Web Service?
Web Service
Web Service is a collection of open protocols and standards used for exchanging data between two different applications or systems.
Why do we need a Web Service?
Web Service allows various applications to communicate and share information with each other. For Example, Java Application can communicate to PHP application through API.
Basically, our Android application cannot access our web server directly. So we need some medium between our Android Application and Web Server. To interact with the MySQL database that resides on our Web Server, we need to build REST API.
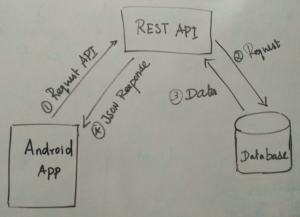
What is RESTful Web Service?
REpresentational State Transfer API is an Application Programming Interface that uses HTTP method to process the data.
Steps to implement Web Service between Android Application and PHP Application
- Connecting to MySQL.
- Create a Web Service(PHP) in Web Server.
- Create a New Project in Android Studio.
- Create a helper classes.
- Initialize the Web Service URL in android application.
- Create a java class for sending HTTP Request.
- Create New Activity and Design User Interface.
- Implement the interaction between Login Activity and API Web Service.
Let’s implement a web service for a simple login application.
1. Connecting to MySQL
Create a new database named myapp and to make it convenient, First we will create a new PHP file for database configuration named config.php.
Create a users table with the following fields (id, username, email, phone, password).
<?php
    $host = 'localhost';
    $user = 'root';
    $pass = ‘’;
    $db = 'myapp';

    // Create connection
    $con = mysqli_connect($host, $user, $pass, $db);

    // Check connection
    if (!$con) { die("Connection failed: " . mysqli_connect_error()); }
    Else{ echo "Connected"; }
?>
2. Create a Web Service in Web Server
To create a Web Service, create a new PHP file called api.php.
Here is the sample snippets for User Login API in PHP.
<?php
	require_once 'config.php';
	$response = array();
	if(isset($_GET['apicall'])){
		switch($_GET['apicall']){

			case 'login':

			$username = $_POST['username'];
			$password = md5($_POST['password']);
			$stmt = $con->prepare("SELECT id, username, email, phone FROM users WHERE username = ? AND password = ?");
			$stmt->bind_param("ss",$username, $password);
			$stmt->execute();
			$stmt->store_result();

			if($stmt->num_rows > 0){

				$stmt->bind_result($id, $username, $email, $phone);
				$stmt->fetch();
				$user = array(
					'id'=>$id,
					'username'=>$username,
					'email'=>$email,
					'phone'=>$phone
				);

				$response['error'] = false;
				$response['message'] = 'Login successful';
				$response['user'] = $user;
			}else{
				$response['error'] = false;
				$response['message'] = 'Invalid username or password';
			}
		break;

                         case ‘signup’:

                         break;

		default:
			$response['error'] = true;
			$response['message'] = 'Invalid Operation Called';
		}
	}
	else{
		$response['error'] = true;
		$response['message'] = 'Invalid API Call';
	}
We can further add multiple API calls like Sign Up, Forgot Password and Reset Passwords using web service. We just need to create another case for Sign Up, Forgot Password and Reset Password.
3. Create a New Project in Android Studio
After creating a new project in android studio, To access the internet, Don’t forget to include the internet permission on the AndroidManifest.xml file after the manifest tag.
<!-- Adding the internet permission -->
<uses-permission android:name="android.permission.INTERNET" />
4. Create a helper classes
After user login, to store our user information in a session, we need to create a session using SharedPrefManager.java.
Create a new file called User.java and add the following snippets.
package com.example.aria_rathna.exampleapp;

/**
* Created by Aria_Rathna on 2017-11-08.
*/
public class User {

   private String username, email, phone;
   private int id;

   public User(int id, String username, String email, String phone) {
       this.id = id;
       this.username = username;
       this.email = email;
       this.phone = phone;
   }

   public String getUsername() {
       return username;
   }

   public String getEmail() {
       return email;
   }

   public String getPhone() {
       return phone;
   }

   public int getId() {
       return id;
   }
}
Create a new file for session named SharedPrefManager.java
package com.example.aria_rathna.exampleapp;

import android.content.Context;
import android.content.Intent;
import android.content.SharedPreferences;
/**
* Created by Aria_Rathna on 2017-11-08.
*/

public class SharedPrefManager {
   //the constants
   private static final String SHARED_PREF_NAME = "exampleapp";
   private static final String KEY_USERNAME = "keyusername";
   private static final String KEY_EMAIL = "keyemail";
   private static final String KEY_PHONE = "keyphone";
   private static final String KEY_ID = "keyid";

   private static SharedPrefManager mInstance;
   private static Context mCtx;

   private SharedPrefManager(Context context) {
       mCtx = context;
   }

   public static synchronized SharedPrefManager getInstance(Context context) {
       if (mInstance == null) {
           mInstance = new SharedPrefManager(context);
       }
       return mInstance;
   }

   //method to let the user login
   //this method will store the user data in shared preferences
   public void userLogin(User user) {
       SharedPreferences sharedPreferences = mCtx.getSharedPreferences(SHARED_PREF_NAME, Context.MODE_PRIVATE);
       SharedPreferences.Editor editor = sharedPreferences.edit();
       editor.putInt(KEY_ID, user.getId());
       editor.putString(KEY_USERNAME, user.getUsername());
       editor.putString(KEY_EMAIL, user.getEmail());
       editor.putString(KEY_PHONE, user.getPhone());
       editor.apply();
   }

   //this method will check whether the user is already logged in or not
   public boolean isLoggedIn() {
       SharedPreferences sharedPreferences = mCtx.getSharedPreferences(SHARED_PREF_NAME, Context.MODE_PRIVATE);
       return sharedPreferences.getString(KEY_USERNAME, null) != null;
   }

   //this method will give the logged in user
   public User getUser() {
       SharedPreferences sharedPreferences = mCtx.getSharedPreferences(SHARED_PREF_NAME, Context.MODE_PRIVATE);
       return new User(
               sharedPreferences.getInt(KEY_ID, -1),
               sharedPreferences.getString(KEY_USERNAME, null),
               sharedPreferences.getString(KEY_EMAIL, null),
               sharedPreferences.getString(KEY_PHONE, null)
       );
   }

   //this method will logout the user
   public void logout() {
       SharedPreferences sharedPreferences = mCtx.getSharedPreferences(SHARED_PREF_NAME, Context.MODE_PRIVATE);
       SharedPreferences.Editor editor = sharedPreferences.edit();
       editor.clear();
       editor.apply();
       mCtx.startActivity(new Intent(mCtx, LoginActivity.class));
   }
}
5. Initialize the Web Service URL in android application
Create a new Java class called WebServiceURL.java and add the following code.
Here, I have added some sample api calls.
public class WebServiceURL {
   private static final String ROOT_URL ="http://123.45.67.890/ExampleAndroidAppTest/api.php?apicall=";

   public static final String URL_REGISTER = ROOT_URL + "signup";
   public static final String URL_LOGIN = ROOT_URL + "login";
   public static final String URL_PRODUCT = ROOT_URL + "product";
   public static final String URL_UPDATEUSER = ROOT_URL + "update";
   public static final String URL_FORGOTPASSWORD = ROOT_URL + "forgotPassword";
   public static final String URL_RESETPASSWORD = ROOT_URL + "resetPassword";
   public static final String URL_ORDERCONFIRM = ROOT_URL + "orderConfirm";
}
Note: On the above code 123.45.67.890 – Change your server IP address. Localhost will not work for the API call.
6. Create a class for sending http Request
In this example, we have used only the POST request. To send a POST request to Web Service URL, Create another Java class called RequestHandler.java.
public class RequestHandler {
       public String sendPostRequest(String requestURL, HashMap<String, String> postDataParams) {
       URL url;

       StringBuilder sb = new StringBuilder();
       try {
           url = new URL(requestURL);
           HttpURLConnection conn = (HttpURLConnection) url.openConnection();
           conn.setReadTimeout(15000);
           conn.setConnectTimeout(15000);
           conn.setRequestMethod("POST");
           conn.setDoInput(true);
           conn.setDoOutput(true);

           OutputStream os = conn.getOutputStream();

           BufferedWriter writer = new BufferedWriter(
                   new OutputStreamWriter(os, "UTF-8"));
           writer.write(getPostDataString(postDataParams));

           writer.flush();
           writer.close();
           os.close();
           int responseCode = conn.getResponseCode();

           if (responseCode == HttpsURLConnection.HTTP_OK) {

               BufferedReader br = new BufferedReader(new InputStreamReader(conn.getInputStream()));
               sb = new StringBuilder();
               String response;

               while ((response = br.readLine()) != null) {
                   sb.append(response);
               }
           }

       } catch (Exception e) {
           e.printStackTrace();
       }
       return sb.toString();
   }


   //The following method will convert a key-value data pair  into a query string as needed to send to the server.
   private String getPostDataString(HashMap<String, String> params) throws UnsupportedEncodingException {
       StringBuilder result = new StringBuilder();
       boolean first = true;
       for (Map.Entry<String, String> entry : params.entrySet()) {
           if (first)
               first = false;
           else
               result.append("&");

           result.append(URLEncoder.encode(entry.getKey(), "UTF-8"));
           result.append("=");
           result.append(URLEncoder.encode(entry.getValue(), "UTF-8"));
       }
       return result.toString();
   }
}
7. Create New Activity and Design User Interface
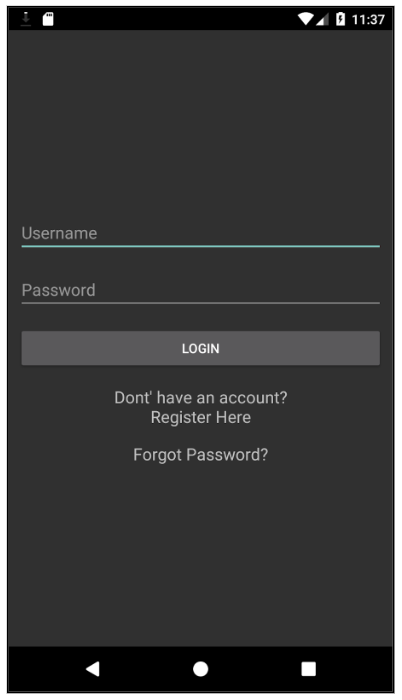
Create a new activity called LoginActivity. Design the login screen in activity_login.xml with two Edit fields, Username and Password field.
8. Implement the interaction between Login Activity and API Web Service
Create / Implement the following functions in LoginActivity.java.
- Initialize the Username and Password edit text fields.
- If user presses the login button, call the user login function. user login function will have the following functions.
- First, get a user entered values of Username and Password field.
- Validating the input by checking not empty fields.
- If validation is passed, Create a request handler object to send the request to the web server.
- Then create a request parameters for username and password.
- Return the Response of the POST request.
- Convert the Response to the JSON object.
- Getting the user information from the response.
- Create a new user object and get the user information.
- Store the user object information into the shared preference manager.
- Start another Activity / Dashboard Activity.
- If user presses the, Register Here button / Forgot Password button, Start the Sign up activity / Forgot Password Activity.
Add the following snippets inside the LoginActivity.java
public class LoginActivity extends AppCompatActivity {

   EditText editTextUsername, editTextPassword;

   @Override
   protected void onCreate(Bundle savedInstanceState) {
       super.onCreate(savedInstanceState);
       setContentView(R.layout.activity_login);

       editTextUsername = (EditText) findViewById(R.id.editTextUsername);
       editTextPassword = (EditText) findViewById(R.id.editTextPassword);

       //if user presses on login
       //calling the method userLogin
       findViewById(R.id.buttonLogin).setOnClickListener(new View.OnClickListener() {
           @Override
           public void onClick(View view) {
               userLogin();
           }
       });

       //if user presses on not registered
       findViewById(R.id.textViewRegister).setOnClickListener(new View.OnClickListener() {
           @Override
           public void onClick(View view) {
               //open register screen
               finish();
               startActivity(new Intent(getApplicationContext(), SignupActivity.class));
           }
       });

       findViewById(R.id.textViewForgotPassword).setOnClickListener(new View.OnClickListener() {
           @Override
           public void onClick(View view) {
               finish();
               startActivity(new Intent(getApplicationContext(), ForgotPasswordActivity.class));
           }

       });
   }

   private void userLogin() {
       Log.d("newwwss", "Login Function Called");
       //First getting the values
       final String username = editTextUsername.getText().toString();
       final String password = editTextPassword.getText().toString();

       //Validating inputs
       if (TextUtils.isEmpty(username)) {
           editTextUsername.setError("Please enter your username");
           editTextUsername.requestFocus();
           return;
       }

       if (TextUtils.isEmpty(password)) {
           editTextPassword.setError("Please enter your password");
           editTextPassword.requestFocus();
           return;
       }

       //If everything is fine

       class UserLogin extends AsyncTask<Void, Void, String> {

           ProgressBar progressBar;

           @Override
           protected void onPreExecute() {
               Log.d("newwwss", "Login Function Called PreExecute");
               super.onPreExecute();
               progressBar = (ProgressBar) findViewById(R.id.progressBar);
               progressBar.setVisibility(View.VISIBLE);
           }

           @Override
           protected void onPostExecute(String s) {

               super.onPostExecute(s);
               progressBar.setVisibility(View.GONE);


               try {

                   Log.d("newwwss", s);
                   //converting response to json object
                   JSONObject obj = new JSONObject(s);
                   Log.d("JsonObject", String.valueOf(obj));
                   //if no error in response
                   if (!obj.getBoolean("error")) {

                       Log.d("Error Display","Inside Loop");
                       Toast.makeText(getApplicationContext(), obj.getString("message"), Toast.LENGTH_SHORT).show();

                       //Getting the user from the response
                       JSONObject userJson = obj.getJSONObject("user");

                       //Creating a new user object
                       User user = new User(
                               userJson.getInt("id"),
                               userJson.getString("username"),
                               userJson.getString("email"),
                               userJson.getString("phone")
                       );

                       //Storing the user in shared preferences
                       SharedPrefManager.getInstance(getApplicationContext()).userLogin(user);

                       //Starting the profile activity
                       finish();
                       startActivity(new Intent(getApplicationContext(), NavigationDrawerActivity.class));
                   } else {
                       Toast.makeText(getApplicationContext(), "Invalid username or password", Toast.LENGTH_SHORT).show();
                   }
               } catch (JSONException e) {
                   e.printStackTrace();
               }
           }

           @Override
           protected String doInBackground(Void... voids) {
               //Creating request handler object
               RequestHandler requestHandler = new RequestHandler();

               //Creating request parameters
               HashMap<String, String> params = new HashMap<>();
               params.put("username", username);
               params.put("password", password);

               //returning the Response of user login
               return requestHandler.sendPostRequest(URLs.URL_LOGIN, params);
           }
       }
       UserLogin ul = new UserLogin();
       ul.execute();
   }
}